
Tape and Mud Drywall in Plano TX
A tall wall can show a small ridge from several parts of the house. Finishing needs to account for those views before paint goes on. Stone Drywall Solutions provides drywall tape and mud services in Plano for high-ceiling interiors and remodeling projects. Our team brings over 20 years of drywall and finishing experience to the work.
Our drywall finishers check the installed board and agree on the intended finish first. That helps separate surface work from corrections needed beneath it.
Call 469-999-8302 to discuss drywall taping and mudding for your Plano property.
Our Drywall Taping and Mudding Services in Plano, TX
- Seam taping. Joint tape is bedded over aligned, supported board edges.
- Compound coats. Successive coats build a controlled transition across each joint.
- Inside corners. Our finishers establish consistent lines at wall and ceiling connections.
- Outside corners. Edge profiles are reinforced and finished for the intended appearance.
- Fastener treatment. Fastener heads receive finishing within the agreed surface level.
- Replacement-board joints. Old-to-new connections are treated after panel alignment is checked.
- Surface review. Sanding and inspection prepare the finished joints for priming or decoration.
The finish level is agreed before work starts. Joint finishing does not correct movement in an unstable assembly.
Tape and Mud Drywall for Plano’s Two-Story Foyers and High-Ceiling Interiors
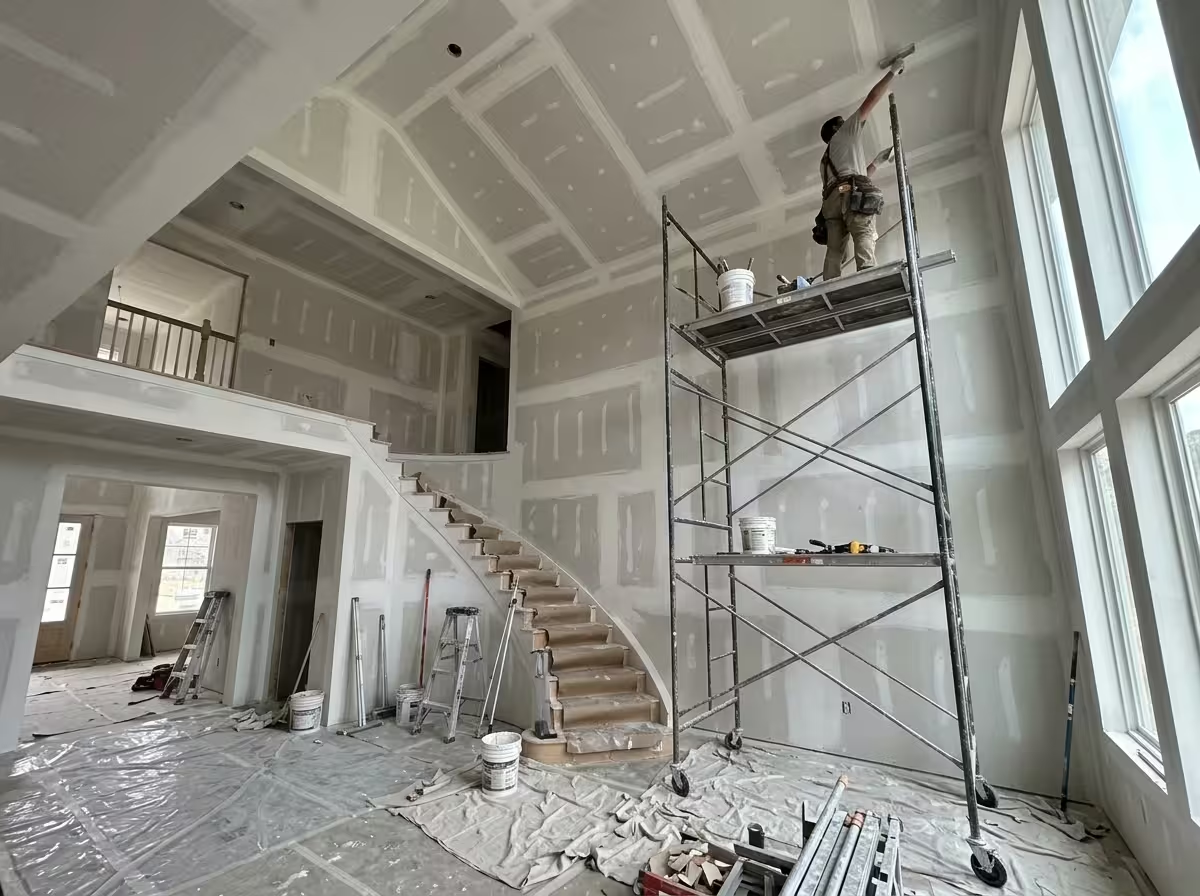
Larger Plano homes can have tall foyer walls connected to stairwells and upper-level landings. A joint may be visible from both floors. Vaulted ceilings add sloped connections above those spaces. The finishing plan should account for the entire visible surface rather than just the section easiest to reach.
Establishing Safe Access for Detailed Work
A long sanding pole can reach some areas, but it does not replace proper access for taping and inspection. Elevated corners need controlled work close to the surface. Equipment should suit the floor layout and stair configuration. Its setup must also protect the finishes beneath it.
Access arrangements affect how the household uses the space. We discuss stairway restrictions and entry routes before work begins. Large furniture may need moving beyond the immediate wall. Enough working room helps the crew apply and check the finish consistently.
High joints should not receive less attention because they are farther from eye level. Window light may make them more noticeable than lower seams. Our joint-finishing specialists check those areas during the finishing stages. Waiting until the equipment is removed can make corrections more disruptive.
Keeping Extended Surfaces Consistent
Drywall joint finishing should blend gradually into the board face. Sudden changes in compound thickness can create visible bands across a tall wall. Successive coats need controlled edges. The goal is a consistent transition rather than simply covering the tape with more material.
Inside corners need a straight, well-formed connection. Uneven buildup can change the apparent line where a wall meets the ceiling. Wide angles require suitable reinforcement and careful shaping. A corner should be established correctly before final sanding.
Inspection should include views from the landing and the foyer below. Light from upper windows may expose defects from only one angle. Our drywall finishers check the surface before deciding it is ready for primer. This helps catch variations that a floor-level review alone could miss.
Finishing Drywall After Open-Concept Renovations in Plano
Removing a partition between a kitchen and living room can leave a strip of unfinished ceiling. The two former rooms may also have different surface heights or textures. Drywall ceiling taping and mudding must address that connection. A narrow patch is not always enough to blend the newly opened space.
Correcting Framing and Board Alignment First
Structural changes need separate evaluation before demolition. Once approved work is complete, the finishing crew can assess the exposed connections. Board edges need suitable backing. A patch spanning an unsupported gap can move even if its surface initially looks smooth.
Different ceiling heights may require framing or substrate adjustments. Compound should not be expected to correct a substantial step between surfaces. Address the alignment before drywall joint taping begins. This creates a better base and avoids excessive buildup over the former wall line.
Joint placement matters when replacement board is fitted. Closely grouped joints and small unsupported pieces can complicate finishing. We plan the board layout around the opening and available backing. Drywall installation and finishing should support the same intended result.
Blending the Repair Across Connected Rooms
The compound often needs to extend beyond the replaced strip. Broad feathering reduces the abrupt edge around the repair. That does not mean coating the whole ceiling by default. The finishing boundary should follow the condition of the adjacent surfaces and the desired appearance.
If the former rooms have different textures, joint finishing alone will not make them match. A shared texture or broader smooth finish may need separate work. We settle that boundary before painting and distinguish seam treatment from full-surface resurfacing in the estimate.
Finish level should also reflect the new lighting layout. Recessed fixtures or large windows can reveal repaired ceiling bands. We discuss the intended sheen and lighting before the final coats. The larger open space may expose details that were less noticeable in separate rooms.
Our Drywall Taping and Mudding Process For Plano, TX
- Board assessment. Our drywall finishers check panel alignment, support and fastening before planning seam treatment and the intended decorative finish.
- Joint reinforcement. Tape and compatible compound reinforce joints and corners. Weak or moving board is identified before a finishing layer covers the connection.
- Finishing level. Lighting and planned paint establish the finish-level discussion. Any broader surface treatment is identified separately from ordinary joint finishing.
- Compound coats. Successive compound coats form a controlled transition across seams, with the required drying between stages. Raised edges are addressed during finishing.
- Sanding and inspection. Our joint-finishing specialists sand and inspect the surface under representative light, then confirm readiness for the next primer or texture stage.
Why Choose Stone Drywall Solutions for Drywall Taping and Mudding
- Board condition checked first. Joint finishing starts with support and alignment rather than extra compound over an unstable base.
- Decoration considered early. Our drywall finishers use the room’s light and intended paint to establish the surface requirements.
- A local finishing business. More than 20 years of drywall and finishing experience back our bonded and insured company.
Our Previous Work
High foyer walls and open living areas make long seams visible from several angles. Our project gallery gives you references for discussing those surfaces in your Plano home.
Prepare Your Drywall for Decoration in Plano
Call our drywall finishers at 469-999-8302 with details of the installed board, room lighting and planned paint or texture. Our drywall finishers inspect long seams and high corners from the room’s normal viewing positions.
Drywall Taping and Mudding Questions and Answers
High foyer seams require repeated equipment access during coating and sanding. A Level 5 surface adds treatment beyond ordinary joint finishing. The estimate identifies both the working height and the intended surface level before the work begins.
Joint quantity, finish level and drying between compound coats determine the schedule. Temperature and ventilation also affect readiness for sanding and primer. We plan the finishing stages without treating a dry surface as proof that every layer is ready.
No. Tape and compound finish a supported joint; they do not stabilize loose board or moving framing. The cause needs attention before finishing. Once the base is sound, correct joint treatment provides a lasting surface for decoration.
Yes, but new openings can mean additional patching and refinishing. Settling fixture locations before the finishing stages avoids unnecessary rework. The lighting and drywall schedules are coordinated around the work actually included.
No. A skim coat improves surface uniformity but does not straighten bowed framing or correct misaligned panels. Those conditions need attention at the base before the final finishing stage.
Plano, TX Services
Transform Your Space with Expert Craftsmanship
Stone Drywall Solutions is your trusted partner for all drywall and painting needs. Contact us today for a free consultation and let us bring your vision to life with quality services you can rely on.